

June 6, 2022
Dishwasher Repair
The dishwasher is one of the most-used and most-missed when broken kitchen appliances. Therefore, if your dishwasher is not draining, you will want to fix the issue as soon as possible. Fortunately, with our guide to help you, you should be able to diagnose and fix the issue yourself.
This guide applies to most KitchenAid dishwashers, including these models:
4KPDI620T0, 4KPDI620T1, 4KPDI620T2, 4KPDI620T3, 4KUDA220T0, 4KUDA220T1, KDFE104DSS0, KDTE104DSS0, KDTE104ESS1, KDTE204DSS0, KDTE254ESS2, KDTE334DSS0, KDTM354DSS4, KUDC10FXSS5, KUDS01FLSS0, KUDS01FLSS6, KUDS30FXSS5, KUDS30IXSS4, KUDS35FXSS5, KUDS35FXSS9, KUDS35FXSSA
Symptoms
Symptom: Dishwasher partially draining (possibly making strange noise)
Likely Cause: Clogged filter, garbage disposal, or sump area; obstruction in the drain hose or around the pump’s impeller
Symptom: Dishwasher not draining at all
Likely Cause: Defective drain pump, drain solenoid valve, or check valve; or garbage dispenser knockout plug not removed
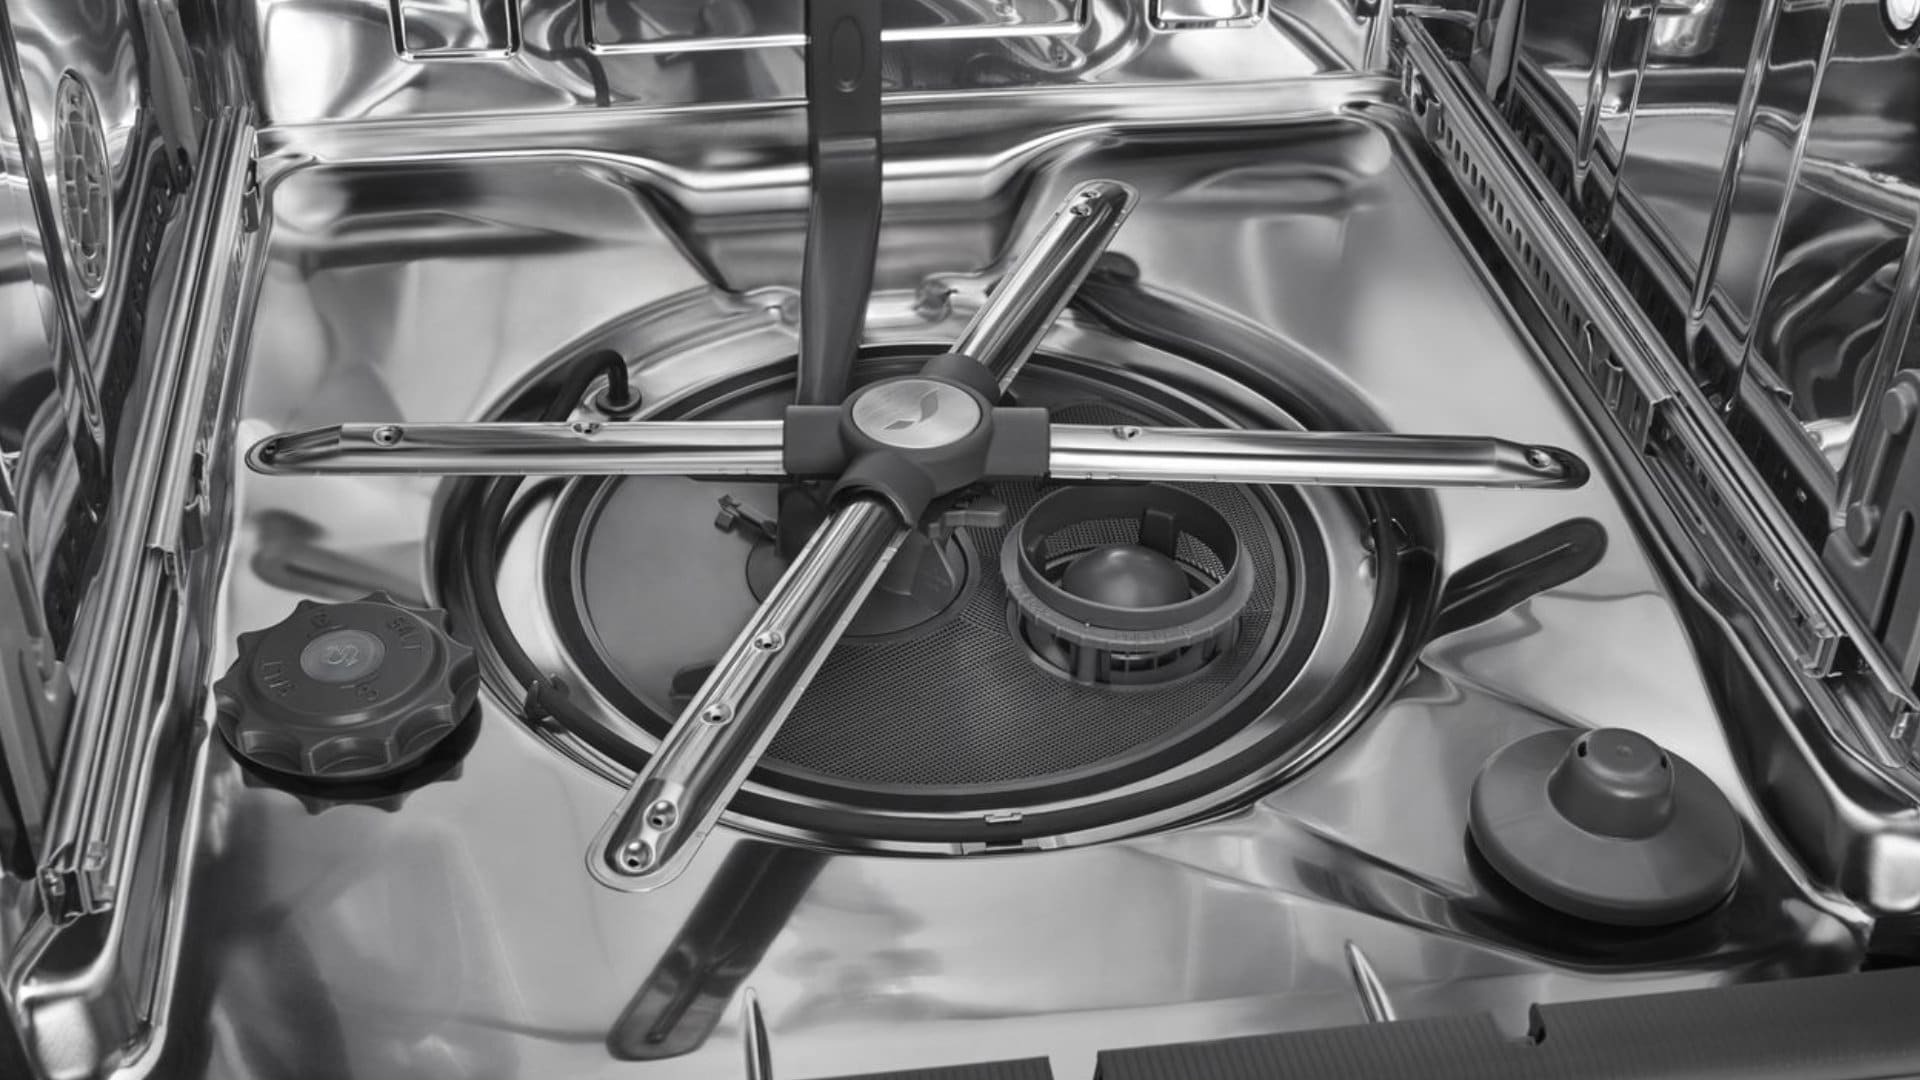
1. Check the filter
Most KitchenAid dishwashers have a filter to catch large food chunks or foreign items like broken glass. If the filter is clogged, the dishwasher will struggle to drain.
Depending on your model, the dishwasher’s filter may be easy to locate and check or require the removal of the lower spray arm and a sump cover.
Follow these steps to check the filter:
- Open the dishwasher door and remove the lower dish rack.
- If necessary, remove the lower spray arm.
- Locate the filter in the tub.
- Remove the filter (depending on the model, you may need to turn it counterclockwise to release it).
- Clean the filter out.
2. Clean out the sump area
Depending on the model, accessing the sump area may require the removal of a screen filter and various other panels and covers. The spray arm assembly may also need to be removed.
Follow these steps to clean out the sump area:
- Disconnect the power to the dishwasher.
- Use a container or a wet vac to remove the water from the dishwasher tub.
- Remove the filter, screen filter, pump cover, etc.
- Check for and remove any food chunks or foreign items like broken glass that may be causing the drainage issue.
- If your model gives you access to the pump impeller, make sure it is not obstructed.
3. Check the garbage disposal
If your dishwasher drain hose is connected to a garbage disposal, a blockage in the disposal could be causing the dishwasher not to drain. Also, if the dishwasher or garbage disposal was recently installed, the garbage disposal knockout plug may not have been removed, which prevents the dishwasher from draining.
Follow these steps to check the garbage disposal:
- Clean out the garbage disposal.
- Consider using a toxin-free drain cleaner to remove any obstructions.
- Check that the knockout plug has been removed by disconnecting the drain hose from where it connects to the garbage disposal.
4. Inspect the check valve
A check valve is designed to open when the dishwasher is draining and close after draining to prevent the discarded water from flowing back into the dishwasher.
Depending on the model, the dishwasher might not have a check valve, but most do. The location of the check valve can also vary.
If your model has a check valve in the tub, usually under a check valve cover, make sure it can open and close. If the valve is causing the drainage issue, replace it.
If the check valve is not accessible from the tub/sump area, it will likely be located where the drain hose connects to the drain pump.
5. Check the drain hose
If your KitchenAid dishwasher isn’t draining, a clogged or incorrectly installed drain hose may be causing the issue.
The drain hose must be installed according to the manufacturer’s specifications, usually with a loop at the end of the drain hose at least 20 inches above the floor.
The easiest part of the drain hose to check is the end that connects to the drainpipe underneath the sink. If you disconnect the hose and find a blockage, you can remove the debris. However, checking the rest of the drain hose will likely require moving the dishwasher and putting it on its back.
In some cases, you may be able to check and remove obstructions by removing the lower kickplate on the front of the dishwasher.
Follow these steps to check the drain hose:
- Make sure the power is disconnected.
- Check that the drain hose end that connects to the drainpipe underneath the sink is not blocked.
- Remove the dishwasher’s kickplate. If you can access the drain hose, disconnect it from the pump. Remove any debris.
- Put the dishwasher on its back. If the dishwasher is hardwired, the wire nuts in the junction box will need to be removed before moving the dishwasher.
- Disconnect the drain hose from the pump.
- Remove any debris that is clogging the drain hose.
- Check for a defective check valve that may be causing the drainage issue.
6. Check the drain pump
If checking for the above issues has failed to find the problem, the drain pump’s impeller may be obstructed, or the pump may need to be replaced.
As with accessing the drain hose, you may be able to access the drain pump by removing the kickplate, but most likely, the dishwasher will need to be put on its back.
Follow these steps to check the drain pump:
- Make sure the dishwasher is disconnected from the power.
- Access the drain pump.
- Check that the pump’s impeller is clear of obstructions and that it can turn freely. If the impeller cannot turn, the pump or impeller needs to be replaced.
- Remove the pump from the dishwasher.
- Test the pump for continuity (a continuous electrical path) with a multimeter.
- If the pump fails the continuity test, replace it.
7. Check the drain solenoid valve
Some Kitchenaid dishwashers have a drain solenoid valve that opens to allow water to exit the dishwasher. If your model has a drain solenoid valve, it can be tested with a multimeter for continuity to determine if it has failed and needs to be replaced.
May. 06, 2024
Why Does Your Self-Cleaning Oven Smell?

May. 06, 2024
Ventless Dryer Pros and Cons Explained

May. 06, 2024
5 Reasons Your Washing Machine Smells

Apr. 09, 2024
How to Resolve the Bosch Dishwasher E15 Error Code

Apr. 09, 2024
How to Balance a Washing Machine (5 Quick Tips)

Apr. 09, 2024
Solutions for a Frigidaire Gas Stove Oven Failure

Mar. 06, 2024
How to Fix a GE Ice Maker Not Working (Quick Fixes)

Mar. 06, 2024
How to Fix the Electrolux Dryer Error Code E64

Mar. 06, 2024
Is Your Whirlpool Ice Maker Not Working? Here’s Why

Feb. 05, 2024
Can Styrofoam Be Microwaved? (Safety and Risks)

Feb. 05, 2024
Agitator vs. No Agitator Washer: What’s Best?

Feb. 05, 2024
Why Is Your Refrigerator Compressor Hot? (6 Potential Causes)

Jan. 03, 2024
How to Use Dishwasher Pods

Jan. 03, 2024
How to Unlock Your Microwave

Jan. 03, 2024
How Many Watts Does a Refrigerator Use?

Dec. 11, 2023
How To Fix a KitchenAid Dishwasher That Isn’t Draining

Dec. 11, 2023
GE Oven F2 Error Code: Causes & Solutions

Dec. 11, 2023
Maytag Washer Not Spinning? 5 Simple Solutions

Nov. 06, 2023
Why Is Your Refrigerator Not Cooling?

Nov. 06, 2023
How to Get Rid of Burnt Smell in Microwave
(877) 560-8485Give us a call
(754) 345-5121Send us a text